POCUS Research
Browse our growing literature library of POCUS related research. Each study links to original study.

JUGULAR VEIN POCUS
Identifying jugular venous distention (JVD) and measuring jugular venous pressure (JVP) at the bedside is one of the most important skills a clinician can have when examining a patient with shortness of breath. However, it is challenging to get right and suffers from many inherent limitations that make the visual inspection of the neck veins very imprecise. With point-of-care ultrasound (POCUS) of the jugular vein, the presence of JVD can be determined with certainty and the JVP can be measured with accuracy approaching a right heart catheterization.
This was shown, for example, in a study in the Journal of the American Society of Echocardiography, which found that a novel POCUS technique, the "Istrail Method," could accurately measure right atrial pressure at the bedside. This involves using POCUS to identify and characterize the jugular vein, and to measure the depth of the right atrium. For a deep dive into the JVD exam, with videos and clinical cases, get a copy of The POCUS Textbook.

Jugular Vein POCUS Overview
Patient & probe positioning
Since the JVD exam is highly dependent on the patient's position, the patient should be lying supine with the head of the bed at about 45 degrees. This is very important, since the Istrail Method was validated at this angle. The linear probe or handheld probe in a vascular preset should be used.
Step 1: Determine if JVD is present
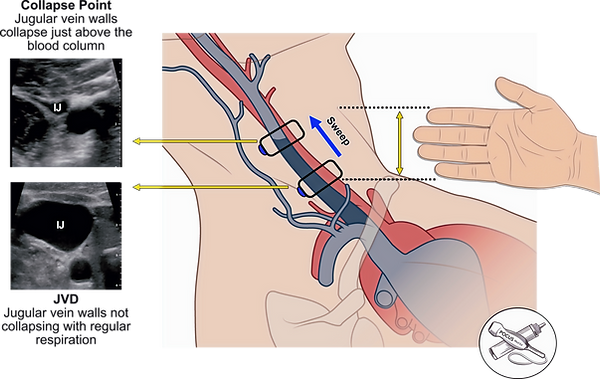
At 45 degrees, in a patient with normal right atrial pressure and no JVD, the jugular vein should be fully or partially collapsed with regular respiration. Most jugular veins sit at the 10 or 12 o'clock position as seen in this example. When JVD is present, the POCUS exam will reveal the jugular vein that is distended without collapse during regular respiration.
If JVD is present, sweep the ultrasound probe up the neck until you find the jugular vein collapse point, where the jugular venous walls are now fully collapsing. This is often absent when right atrial pressure is high, and the collapse point may be above the mandible. Instead of measuring this height with a ruler, a clinician can measure their outstretched fingers as a surrogate to estimate the height. This is the height of the blood column in the visible portion of the vein.
Step 2: Measure the right atrial depth using POCUS
In the traditional JVP exam, we are taught to add 5 centimeters to the measurement we get from step 1 to estimate the jugular venous pressure in centimeters of water. This is based on the assumption that the right atrium sits 5 centimeters below the sternum. However, we now know this is not true. The average depth is about 9 centimeters, but varies from 5 to 15 centimeters depending on the patient's body habitus. The only way to accurately measure this depth is with point-of-care ultrasound.
With the patient supine, acquire a parasternal long axis view of the heart. Then measure from the top of the screen down to the posterior wall of the left ventricular outflow tract. This sits in the same coronal plane as the center of the right atrium and can be used as a surrogate.
Since the height of a fluid column is equal to the pressure it exerts, adding these two measurements together will give you an estimated jugular venous pressure (JVP) in centimeters of water. This JVP estimate is synonymous with the right atrial pressure. A normal right atrial pressure is under 10 centimeters of water. To convert this to millimeters of mercury, which is the unit used in a right heart catheterization, multiply by 0.74. For more in-depth analysis and video tutorials, or to learn how to measure the right atrial pressure when JVD is absent, consider getting a copy of The POCUS Textbook.